.png)
Editing Photometric Files
Photometric files (IES files) contain angular luminous intensity data and are a crucial input for accurate lighting simulations. They supply characteristics of the lighting distribution and intensity and as such greatly impact the lighting simulation and rendering results. These files come from a variety of sources including directly from the manufacturer, independent photometric testing labs, and even computer simulations. When working with Revit models, there is also a secondary modeling process that occurs. The photometric file is loaded into a luminaire family to create the light source, where it must be properly positioned to ensure the housing geometry does not create undue shadows. This complex ecosystem of lighting fixture data being prepared by many creators can unfortunately lead to modeling errors which reduce simulation accuracy and rendering quality.
To help manage this, LightStanza includes a function to edit IES files and correct for most common issues with 3rd party content. To access the editor, click the 3 vertical dots below the luminaire type of interest and select "View/Edit IES File".

The edit tool enables you to change many of the photometric file properties for the selected luminaire.
Light Loss Factor (LLF) - A simple proration factor to account for lower lumen outputs after a lighting system is installed. The default value is determine by user settings. This can be adjusted to any value, or determined using the calculation shown below.
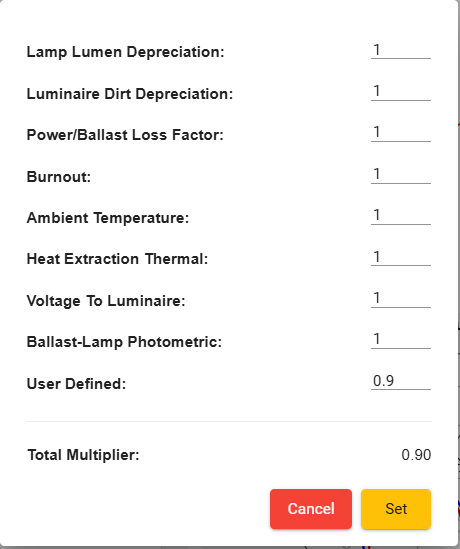
- Number of sources: Factor to account for differing numbers of lamps being added to the same luminaire. For LED luminaires, without traditional lamps, this should typically be set to 1. For traditional source types, this factor can be used for different configurations of the same luminaire (i.e. 2, 3, or 4, fluorescent tubes).
- Lum/Source: The bare lamp lumens of the source, before loses due to housing absorption are considered.
- Output multiplier: This factor prorates both total lumen output, and updates the input watts for reporting purposes.
- Keywords: These are standard and custom fields added by the photometric lab that produced the IES file. These do not have any effect on lighting calculations or renderings, but can be useful for ordering luminaires and producing accurate lighting fixture schedules.
- Photometric positioning tools
- Edit Luminous Dimensions
- These should be set based on the dimensions of the visible portion of the luminous area. Typically these are the housing's aperture dimensions, for most common luminaire types.
- For best performance, set luminous dimensions as accurately as possible. Particularly, avoid using luminous dimensions of 0 since point-sources can create unexpected calculation and rendering artifacts.
- Edit IES Position Relative to Fixture
- Re-position the IES file in X, Y, and/or Z directions to ensure it is not blocked by luminaire housing.
- Edit IES Rotation Relative to Fixture
- Rotate the IES file in X, Y, and/or Z directions to correct for improper aiming. Typically, rotation angles of 90 work best for ceiling mounted luminaires and 0 is recommended for wall mounted luminaires. This can, however, depend on the coordinate system used in the original IES file.
- Edit Layer Visibility
- Optionally change the visibility of the following luminaire components.
- Family Geometry
- Luminous Opening
- IES Photometric Web
- Optionally change the visibility of the following luminaire components.
- Edit Luminous Dimensions

